Formatting disks and Creating sampler libraries; S2000; #Bookkeeping  
Step 1; Power on cabinet 15's conditioner.
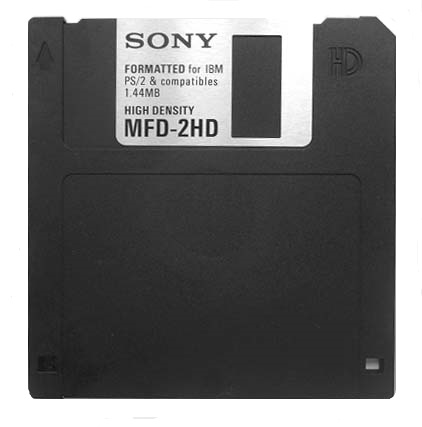
Step 2; Locate S2000 system disk (unmarked beige Sony diskette) and insert it into the S2000's drive; once loaded, this diskette can be removed.
Step 3; Insert an unmarked 1.44 MB disk into the S2000's drive; press 'GLOBAL','PAGE DN','PAGE DN','PAGE DN','PAGE DN','PAGE DN','F2','F2' and wait; we have instructed the device to format the inserted diskette.
Step 4; With the disk now usable, clear out of the prompt by pressing 'SINGLE' and 'EDIT'. Now press 'SAMPLE'.
Step 5; Press 'PAGE DN','PAGE DN','PAGE DN','PAGE DN', and after connecting a source (Ex. AP-16T),'F2'; Feed sample, press 'F2','PAGE UP','PAGE UP','PAGE UP','PAGE UP','F2', and edit the displayed name to 'TINE' from 'SINE' via the flywheel; each subsequent sample will continue the journey of the first character's incremental creep (Ex. 'SINE','TINE','UINE','VINE','WINE','XINE','YINE',etc.).
Step 6; After the entire library has been encapsulated, edit the individual samples' pitch and MIDI note mappings from 'SINGLE'>'EDIT'>'PAGE DN'>'PAGE DN'>'PAGE DN'>'PAGE DN'>'PAGE DN'>'PAGE DN'>'F2'>'F2'>'F2'>'F2'>'F2'>'F2'>'F2'>'F2'>'F2'>'F2'>'F2'>'PAGE DN'>'PAGE DN'>'F1'>set-to-'C2'>'F2'>set-to-'C2'>'F1'>'F1'>'flywheelR'>'F2'>set-to-'C#2'>'F2'>set-to-'C#2'>'F1'>'F1'>'flywheelR'>'F2'>set-to-'D2'>'F2'>set-to-'D2'>'F1'>'F1'>'flywheelR'>'F2'>set-to-'D#2'>'F2'>set-to-'D#2'>'F1'>'F1'>'flywheelR'>'F2'>set-to-'E2'>'F2'>set-to-'E2'>'F1'>'F1'>'flywheelR'>'F2'>set-to-'F2'>'F2'>set-to-'F2'>'F1'>'F1'>'flywheelR'>'F2'>set-to-'F#2'>'F2'>set-to-'F#2'>'F1'>'F1'>'flywheelR'>'F2'>set-to-'G2'>'F2'>set-to-'G2'>'F1'>'F1'>'flywheelR'>'F2'>set-to-'G#2'>'F2'>set-to-'G#2'>'F1'>'F1'>'flywheelR'>'F2'>set-to-'A2'>'F2'>set-to-'A2'>'F1'>'F1'>'flywheelR'>'F2'>set-to-'A#2'>'F2'>set-to-'A#2'>'F1'>'F1'>'flywheelR'>'F2'>set-to-'B2'>'F2'>set-to-'B2'>'F1'>'F1'>'flywheelR'>'F2'>set-to-'C3'>'F2'>set-to-'C3'>
|


![[X]](../images/legend.jpg)